
1.概述
XDP是Linux网络路径上内核集成的数据包处理器,具有安全、可编程、高性能的特点。当网卡驱动程序收到数据包时,该处理器执行BPF程序。XDP可以在数据包进入协议栈之前就进行处理,因此具有很高的性能,可用于DDoS防御、防火墙、负载均衡等领域。
XDP 通过在内核中运行 eBPF(Extended Berkeley Packet Filter)程序来实现这一点。其与dpdk的区别在于:
- 性能:XDP 和 DPDK 都旨在提高数据包处理性能,但它们的实现方式不同。XDP 在内核空间运行,而 DPDK 在用户空间运行。
- 易用性:XDP 更容易集成到现有的 Linux 环境中,因为它是内核的一部分。DPDK 需要专门的驱动程序和配置,另外无法利用网络栈,需要自行在用户空间额外实现一套网络栈。
- 灵活性:DPDK 提供了更丰富的 API 和功能,但需要更多的开发和维护工作。XDP 则更轻量级,适合简单的高性能数据包处理任务。
2. 数据结构
XDP程序使用的数据结构是xdp_buff而不是sk_buff,前者可以视为后者的轻量级版本,两者的区别在于:sk_buff包含数据包的元数据,xdp_buff创建更早而且不依赖于其他内核层,因此XDP可以更快地获取和处理数据包。
xdp_buff数据结构定义:
// /linux/include/net/xdp.h
struct xdp_rxq_info {
	struct net_device *dev;
	u32 queue_index;
	u32 reg_state;
	struct xdp_mem_info mem;
} ____cacheline_aligned; /* perf critical, avoid false-sharing */

struct xdp_buff {
	void *data;
	void *data_end;
	void *data_meta;
	void *data_hard_start;
	unsigned long handle;
	struct xdp_rxq_info *rxq;
};
而sk_buff数据结构定义如下:
// /include/linux/skbuff.h
struct sk_buff {
	union {
		struct {
			/* These two members must be first. */
			struct sk_buff		*next;
			struct sk_buff		*prev;

			union {
				struct net_device	*dev;
				/* Some protocols might use this space to store information,
				 * while device pointer would be NULL.
				 * UDP receive path is one user.
				 */
				unsigned long		dev_scratch;
			};
		};
		struct rb_node		rbnode; /* used in netem, ip4 defrag, and tcp stack */
		struct list_head	list;
	};

	union {
		struct sock		*sk;
		int			ip_defrag_offset;
	};

	union {
		ktime_t		tstamp;
		u64		skb_mstamp_ns; /* earliest departure time */
	};
	/*
	 * This is the control buffer. It is free to use for every
	 * layer. Please put your private variables there. If you
	 * want to keep them across layers you have to do a skb_clone()
	 * first. This is owned by whoever has the skb queued ATM.
	 */
	char			cb[48] __aligned(8);

	union {
		struct {
			unsigned long	_skb_refdst;
			void		(*destructor)(struct sk_buff *skb);
		};
		struct list_head	tcp_tsorted_anchor;
	};

#if defined(CONFIG_NF_CONNTRACK) || defined(CONFIG_NF_CONNTRACK_MODULE)
	unsigned long		 _nfct;
#endif
	unsigned int		len,
				data_len;
	__u16			mac_len,
				hdr_len;

	/* Following fields are _not_ copied in __copy_skb_header()
	 * Note that queue_mapping is here mostly to fill a hole.
	 */
	__u16			queue_mapping;

/* if you move cloned around you also must adapt those constants */
#ifdef __BIG_ENDIAN_BITFIELD
#define CLONED_MASK	(1 << 7)
#else
#define CLONED_MASK	1
#endif
#define CLONED_OFFSET()		offsetof(struct sk_buff, __cloned_offset)

	__u8			__cloned_offset[0];
	__u8			cloned:1,
				nohdr:1,
				fclone:2,
				peeked:1,
				head_frag:1,
				xmit_more:1,
				pfmemalloc:1;
#ifdef CONFIG_SKB_EXTENSIONS
	__u8			active_extensions;
#endif
	/* fields enclosed in headers_start/headers_end are copied
	 * using a single memcpy() in __copy_skb_header()
	 */
	/* private: */
	__u32			headers_start[0];
	/* public: */

/* if you move pkt_type around you also must adapt those constants */
#ifdef __BIG_ENDIAN_BITFIELD
#define PKT_TYPE_MAX	(7 << 5)
#else
#define PKT_TYPE_MAX	7
#endif
#define PKT_TYPE_OFFSET()	offsetof(struct sk_buff, __pkt_type_offset)

	__u8			__pkt_type_offset[0];
	__u8			pkt_type:3;
	__u8			ignore_df:1;
	__u8			nf_trace:1;
	__u8			ip_summed:2;
	__u8			ooo_okay:1;

	__u8			l4_hash:1;
	__u8			sw_hash:1;
	__u8			wifi_acked_valid:1;
	__u8			wifi_acked:1;
	__u8			no_fcs:1;
	/* Indicates the inner headers are valid in the skbuff. */
	__u8			encapsulation:1;
	__u8			encap_hdr_csum:1;
	__u8			csum_valid:1;

#ifdef __BIG_ENDIAN_BITFIELD
#define PKT_VLAN_PRESENT_BIT	7
#else
#define PKT_VLAN_PRESENT_BIT	0
#endif
#define PKT_VLAN_PRESENT_OFFSET()	offsetof(struct sk_buff, __pkt_vlan_present_offset)
	__u8			__pkt_vlan_present_offset[0];
	__u8			vlan_present:1;
	__u8			csum_complete_sw:1;
	__u8			csum_level:2;
	__u8			csum_not_inet:1;
	__u8			dst_pending_confirm:1;
#ifdef CONFIG_IPV6_NDISC_NODETYPE
	__u8			ndisc_nodetype:2;
#endif

	__u8			ipvs_property:1;
	__u8			inner_protocol_type:1;
	__u8			remcsum_offload:1;
#ifdef CONFIG_NET_SWITCHDEV
	__u8			offload_fwd_mark:1;
	__u8			offload_l3_fwd_mark:1;
#endif
#ifdef CONFIG_NET_CLS_ACT
	__u8			tc_skip_classify:1;
	__u8			tc_at_ingress:1;
	__u8			tc_redirected:1;
	__u8			tc_from_ingress:1;
#endif
#ifdef CONFIG_TLS_DEVICE
	__u8			decrypted:1;
#endif

#ifdef CONFIG_NET_SCHED
	__u16			tc_index;	/* traffic control index */
#endif

	union {
		__wsum		csum;
		struct {
			__u16	csum_start;
			__u16	csum_offset;
		};
	};
	__u32			priority;
	int			skb_iif;
	__u32			hash;
	__be16			vlan_proto;
	__u16			vlan_tci;
#if defined(CONFIG_NET_RX_BUSY_POLL) || defined(CONFIG_XPS)
	union {
		unsigned int	napi_id;
		unsigned int	sender_cpu;
	};
#endif
#ifdef CONFIG_NETWORK_SECMARK
	__u32		secmark;
#endif

	union {
		__u32		mark;
		__u32		reserved_tailroom;
	};

	union {
		__be16		inner_protocol;
		__u8		inner_ipproto;
	};

	__u16			inner_transport_header;
	__u16			inner_network_header;
	__u16			inner_mac_header;

	__be16			protocol;
	__u16			transport_header;
	__u16			network_header;
	__u16			mac_header;

	/* private: */
	__u32			headers_end[0];
	/* public: */

	/* These elements must be at the end, see alloc_skb() for details.  */
	sk_buff_data_t		tail;
	sk_buff_data_t		end;
	unsigned char		*head,
				*data;
	unsigned int		truesize;
	refcount_t		users;

#ifdef CONFIG_SKB_EXTENSIONS
	/* only useable after checking ->active_extensions != 0 */
	struct skb_ext		*extensions;
#endif
};
3. 工作模式
XDP程序是通过bpf()系统调用控制的,bpf()系统调用使用程序类型BPF_PROG_TYPE_XDP进行加载。
XDP支持三种操作模式,默认使用native模式
- Native XDP:在native模式下,XDP BPF程序运行在网络驱动的早期接收路径上(RX队列),因此,使用该模式时需要网卡驱动程序支持。
- Offloaded XDP:在Offloaded模式下,XDP BFP程序直接在NIC(Network Interface Controller)中处理数据包,而不使用主机CPU,相比native模式,性能更高。
- Generic XDP:Generic模式主要提供给开发人员测试使用,对于网卡或驱动无法支持native或offloaded模式的情况,内核提供了通用的generic模式,运行在协议栈中,不需要对驱动做任何修改。生产环境中建议使用native或offloaded模式
一个简单的XDP程序如下:
/* SPDX-License-Identifier: GPL-2.0 */
#include <linux/bpf.h>
#include <bpf/bpf_helpers.h>

SEC("xdp")
int  xdp_prog_simple(struct xdp_md *ctx)
{
	return XDP_PASS;
}

char _license[] SEC("license") = "GPL";
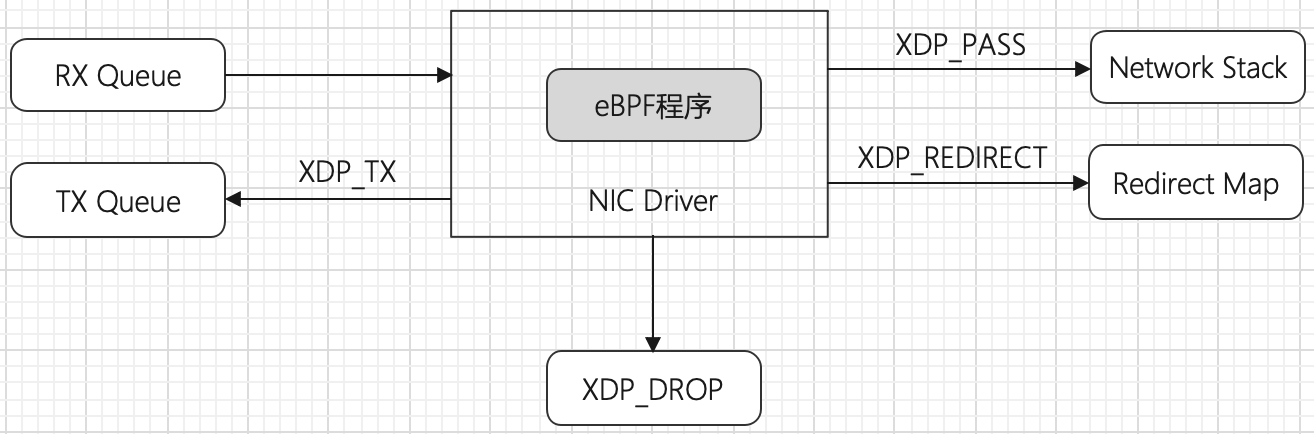
使用libbpf提供的SEC宏来定义xdp 程序段,每个程序段是一个函数,该函数需要返回一个XDP状态码,来指示xdp该如何处理当前收到的包,XDP共提供了5个状态码:
- XDP_DROP:丢弃数据包,发生在驱动程序的最早RX阶段
- XDP_PASS:将数据包传递到协议栈处理,操作可能为以下两种形式:
- 正常接收数据包,分配愿数据sk_buff结构并且将接收数据包入栈,然后将数据包引导到另一个CPU进行处理。他允许原始接口到用户空间进行处理。 这可能发生在数据包修改前或修改后。
- 通过GRO(Generic receive offload)方式接收大的数据包,并且合并相同连接的数据包。经过处理后,GRO最终将数据包传入“正常接收”流.。
- XDP_TX:转发数据包,将接收到的数据包发送回数据包到达的同一网卡。这可能在数据包修改前或修改后发生。
- XDP_REDIRECT:数据包重定向,XDP_TX,XDP_REDIRECT是将数据包送到另一块网卡或传入到BPF的cpumap中。
- XDP_ABORTED:表示eBPF程序发生错误,并导致数据包被丢弃。自己开发的程序不应该使用该返回码。
4. 安装运行
一般ubuntu等常用linux发行版对于bpf/xdp已有支持,可以直接编写源码并使用clang编译:
clang -O2 -Wall -target bpf -c xdp_filter.c -o xdp_filter.o
然后使用ip命令挂载到网卡上,默认选择最合适的位置挂载,sec参数可以指定程序入口点:
sudo ip link set dev ens33 xdp obj xdp_filter.o sec mysection
查看网卡挂载XDP程序:
ip link show dev ens33
卸载xdp程序:
sudo ip link set dev ens33 xdp off
需要注意的是,系统自带的网卡一般iproute2软件版本较低,在挂载包含全局变量的XDP程序时存在问题,因此我们可以安装最新的iproute2,注意在此之前要安装libbpf(上一节的示例程序也需要安装libbpf),但是apt安装的libbpf版本过低,只有0.5,因此手动拉仓库安装最新版进行编译安装,注意先要安装clang-12,并指定为默认clang:
sudo apt install clang-12
sudo update-alternatives --install /usr/bin/clang clang /usr/bin/clang-12 30 \
--slave /usr/bin/clang++ clang++ /usr/bin/clang++-12
如已安装clang,在执行上述命令后,使用下列命令来进行版本指定
sudo update-alternatives --config clang
拉取并安装libbpf:
git clone https://github.com/libbpf/libbpf.git
cd libbpf/src
make
sudo make install
注意libbpf的pc包文件被安装到/usr/lib64/pkgconfig下面,因此pkg-config无法读到该包,在安装后续软件的时候会出现问题,因此我们把该路径加到~/.bashrc中:
sudo echo 'export PKG_CONFIG_PATH="/usr/lib64/pkgconfig:$PKG_CONFIG_PATH"' >> ~/.bashrc
source ~/.bashrc
然后就可以使用pkg-config来查看libbpf版本以及库路径:
umbrella-leaf@DESKTOP-RVPDT4L:~$ pkg-config --modversion libbpf
1.5.0
umbrella-leaf@DESKTOP-RVPDT4L:~$ pkg-config --libs libbpf
-L/usr/lib64 -lbpf
下面安装最新版的iproute2:
git clone https://github.com/iproute2/iproute2.git
cd iproute2
sudo ./configure
sudo make install
之后就可以挂载包含全局变量的XDP程序。
另外,使用ip命令只能在一个网卡上挂载单个XDP程序,如果想要挂载多个XDP程序,就需要用到xdp-dispatcher,可以安装xdp-loader工具,这个工具属于xdp-tools仓库,我们拉下这个仓库并编译安装,注意编译前请勿安装bpftool工具,会因为额外编译的工具导致整个项目编译失败:
git clone https://github.com/xdp-project/xdp-tools.git
cd xdp-tools
./configure
make
sudo make install
然后就可以使用xdp-loader来在一块网卡上挂载多个XDP程序(通过xdp-dispatcher):
sudo xdp-loader load -m skb eth0 test_xdp.bpf.o
sudo xdp-loader load -m skb eth0 test_xdp_2.bpf.o
其中-m参数指定XDP挂载模式,native表示挂载在网卡驱动上,skb表示挂载在内核栈中,hw表示挂载在网卡硬件上。
查看网卡挂载情况:
sudo xdp-loader status eth0
卸载XDP程序:
# 卸载网卡上某个指定id的程序
sudo xdp-loader unload -i <id> eth0
# 卸载网卡上所有XDP程序
sudo xdp-loader unload -a eth0
编写下列的XDP程序test_xdp.bpf.c:
#include <linux/bpf.h>
#include <bpf/bpf_helpers.h>

SEC("xdp")
int xdp_drop(struct xdp_md *ctx) {
    static int count = 0;
    ++count;
    if (count % 2) {
        return XDP_PASS;
    } else {
        return XDP_DROP;
    }
}

char __license[] SEC("license") = "GPL";
这个程序使用一个全局计数器,使得网卡收到奇数编号包时直接放行,收到偶数编号包时则丢弃。
使用clang编译,xdp-loader挂载,注意编译时必须带-g参数!否则无法以dispatcher形式挂载,因此生成的对象文件里没有BTF(BPF Type Format)信息:
clang -O2 -Wall -target bpf -c -g test_xdp.bpf.c
sudo xdp-loader load -m skb eth0 test_xdp.bpf.o
挂载时如果有报错libxdp: No bpffs found at /sys/fs/bpf,那么需要执行以下命令手动挂载bpf文件系统:
sudo mount -t bpf bpf /sys/fs/bpf/
查看挂载情况:
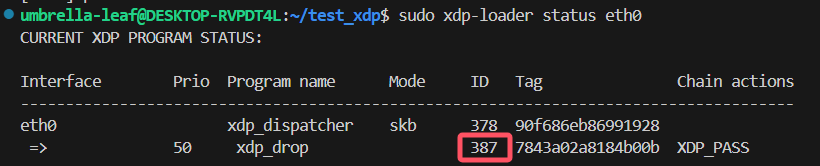
挂载的XDP程序id为387,而负责分发的dispatcher id为378,但通过ip来看挂载情况,只能看到dispatcher:

实际测试,可以通过ping命令来查看联通情况:

可以看到,挂载的XDP程序运行正确。
5. 进一步学习
进一步学习XDP程序如何编写与挂载,可以下载 xdp-tutorial 仓库进行学习。